Category: Software Development
-
PostgreSQL or Postgres?
I usually use “Postgres” when speaking to other developers and PostgreSQL in documents when I can use the capitalised “SQL” for emphasis. Here’s how the PostgreSQL name came up: PostgreSQL evolved from the Ingres project at the University of California, Berkeley. In 1982, the leader of the Ingres team, Michael Stonebraker, left Berkeley to make a proprietary version…
-
Signal App’s awkward copy-paste gesture
The “Copy message” button in the Signal App on iPhone doesn’t show up when you long press the text (on the pop-up ribbon like other messaging apps). The copy icon is placed in the bottom Tab Bar. That seems like an awkward UX error for such a mature app! Or is it just me wondering…
-
Reading and Writing Excel (xlsx) files with Python
Jan 2021 Update For Writing: use xlsxwriter (don’t use xlwt, it doesn’t support xlsx format.)For Reading: use openpyxl (xlrd removed the support for xlsx in Dec 2020 due to security concerns.)
-
Setting up Django on Windows IIS Server
This post is licensed under a Creative Commons Attribution-ShareAlike 4.0 International License.
-
Why, When, and How to use Celery with Python
“Celery is an asynchronous task queue based on distributed message passing.” Let’s break that down:
-
Setting up a Python Virtual Environment for Web Development
Virtual Environments are helpful in keeping all the dependencies (packages), required for a Python project, in one place. So you can avoid issues with conflicting dependencies when working on different projects simultaneously. For instance, one major use case is when you want to run different Python versions like 2.7, 3.5, and 3.6 on the same…
-
Django’s Request-Response Cycle
Understanding the Request-Response Cycle is a crucial step in setting up for any WebServer. An example of the request-response cycle is when you “request” a web page by entering a URL in your browser and a web server sends a web page as ‘response’ to your browser. Of course, there’re usually several HTTP requests that…
-
git for beginners
I’ll keep this very short, because I want to show beginners how little they need to remember to get started. 1. If you are working on a small personal project, you only need to learn these six commands on a day to day basis: 2. And when working with others, you’ll also frequently use: 3.…
-
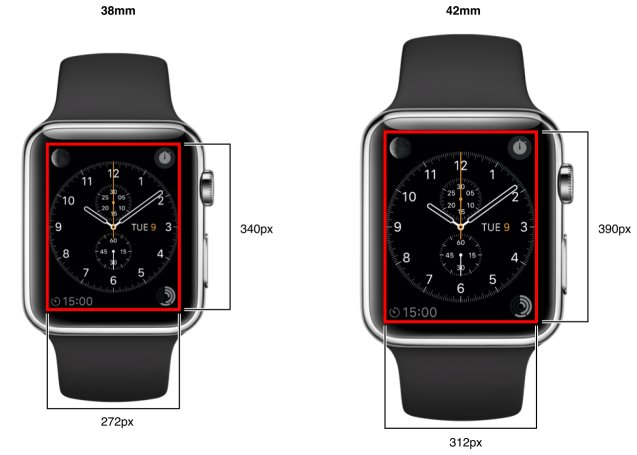
Designing the Apple Watch UI – a quick guide
The Apple Watch is releasing in a month! Here’s a list of important things you need to know, if you’re interested in designing or developing an Apple Watch App: 1. Layout and Screen Sizes 38mm: 340 pixels x 272 pixels 42mm: 390 pixels x 312 pixels That’s an aspect ratio of 4:5. 2. Icon…