This post is licensed under a Creative Commons Attribution-ShareAlike 4.0 International License.

This post has been built over this very good post by Matt Woodward. The main edits/additions I’ve made to the original article are:
- Added the section on configuring a MySQL or Sqlite3 database on Windows.
- Added information on configuring the Firewall to access the Django install from remote computers.
- Re-ordered some steps to group them better.
For instance instead of first setting up IIS → then Django → then finalising IIS configuration, the flow in this post is to set up Django at the start followed by the IIS configuration. - Simplified the text at places where I felt the text was too verbose or where I found it confusing.
Software development skills required to handle the installation:
- Working knowledge of Python.
- Fairly good understanding of WebServers in Python (viz. Django).
- Basic competence in Windows system administration tasks. For example: DO NOT disable the firewall; they are important on servers. I have detailed how to work with Firewalls in the last section.
Software Required:
- Python, Django, wfastcgi
- IIS
- Windows Server 2012 R2 or Windows Server 2016 (64-bit)
- Database (Optional): MySQL/SQLite/PostgreSQL + DB Connector for Python
- Knowledge of Php, Apache, and Webserver technologies would come in handy.
A quick note on wfastcgi and WSGI:
There aren’t really any issues in targetting Windows Server and IIS as the production environment for your Django application, other than including the wfastcgi Python package (https://pypi.python.org/pypi/wfastcgi) in your application.
wfastcgi is maintained by Microsoft and provides a file that serves as the entry point of the IIS handler for WSGI applications in Python. It’s similar in purpose to a tool like Gunicorn (http://gunicorn.org), with the end result being that requests that come into IIS are handed off to the Python application for processing.
Let’s Start:
1. Install Python
Download the latest Windows x86-64 executable installer from https://python.org
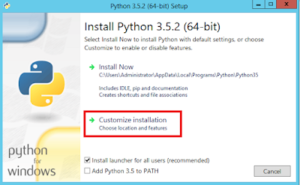
- Double-click the Python installer. If you get a security warning at this point, click “Run” to continue.
- In the Python Setup dialog that appears, click “Customize Installation”
- On the Optional Features step, leave the default settings and click “Next”
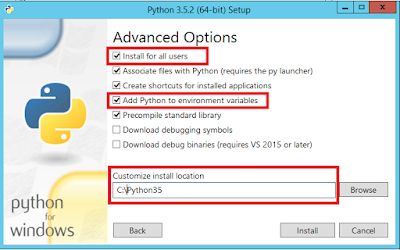
On the Advanced Options step, make the following changes:
- Check the “Install for all users” box (note that this will also check the “Precompile standard library” box)
- Check “Add Python to environment variables”
- In the input box below “Customize install location” change the value to the following:
C:\Python35
- Click “Install”
- When the installation is complete, click “Close”

Confirm the Python installation works by typing python --version on a new command prompt (open a new command prompt so that Env variables viz. PYTHONPATH is loaded). The command will output the Python version installed on your computer.
2. Create and Configure a Python Virtual Environment
Say, you keep all your virtual environments in a virtualenvs directory. Then in a command prompt:
cd C:\
mkdir virtualenvs
cd virtualenvs
Create a virtual environment named django_iis_demo_env inside virtualenvs:
python -m venv django_iis_demo_envEnter the newly created virutual environment and activate it:
cd django_iis_demo_env
Scripts\activate.bat  # activate the virtual env
python -m pip install --upgrade pip  # Upgrade pip
3. Setup the Django Project
Install Django and other project dependencies:
- Place your Django code directory inside the
django_iis_demo_envdirectory.cd into your Django code directory.
- Install the project dependencies:
pip install -r requirements.txt Install wfastcgi
pip install wfastcgiwfastcgi is a WSGI similar in purpose to Gunicorn or uwsgi.
wfastcgiis maintained by Microsoft and you would be better of using this than trying to compile other linux based WSGI servers on windows. If your Django App is to be used on Windows only, you can consider puttingwfastcgiin the requirements.txt file.
4. Most probably you need a database for the Django Project
To use MySQL with this Django App:
(For a very detailed “How to install MySQL 8 on Windows Server 2016” see my other post.)
- Download the MySQL installer from here: https://dev.mysql.com/downloads/installer/
- I prefer downloading the larger package listed here. I find it better to have a full snapshot of the installer used during setup. The latest version, at the time of this writing, is MySQL 8.0.15 (MySQL 8.0.11 has known bugs!). The smaller ~15MB file eventually downloads the main MySQL installer while finishing the steps.
- Double-click MySQL 8 from the executable
.msifile. - Goto custom settings and select the Python connector.
- Set up a root password (Make a note of the Password at a safe place).
- Login to MySQL as superuser:
mysql -u <superuser> -p - Create Database:
CREATE DATABASE mydatabase CHARACTER SET utf8mb4 COLLATE utf8mb4_unicode_ci; - Create a DB User with Password:
mysql> CREATE USER '<DATABASE_USER>'@'localhost' IDENTIFIED BY '<DATABASE_PASSWORD>'; - Grant permissions to user for the database:
mysql> GRANT ALL PRIVILEGES ON <DATABASE_NAME>.* TO '<DATABASE_USER>'@'localhost';- Then, if you have a MySQL dump file, import the database into MySQL:
mysql -u DATABASE_USER_ID -p <DATABASE_NAME> < db_dump_file.sql - If you don’t have a MySQL database dump file, initialise a fresh set of database tables (See the following section).
- Make sure the Django Projects
settings.pyfile contains the settings to connect to the MySQL database (See: https://docs.djangoproject.com/en/2.1/ref/settings/#std:setting-DATABASES)
(Optionally you can set up PhpMyAdmin to manage the MySQL database via UI.)
(Note: In my testing, I found that MySQL was rather slow on Windows, so do consider the Database choice well. That’s beyond the scope of this article but I encourage you to research it a bit.)
(Note: The steps for PostgreSQL would be similar, with minor changes to the commands.)
To use SQLite3 with this Django App:
It’s quite simple to work with SQLite3, as you don’t have to configure the Database Name, DB User, Password, etc.
Just download a pre-compiled SQLite3 binary from https://sqlite.org/download.html. Make sure sqlite is in your PATH variable.
Then, you simply need the SQLite3 database file and make sure the Django Projects settings.py file contains the settings to connect to the Sqlite3 database (https://docs.djangoproject.com/en/2.1/ref/settings/#std:setting-DATABASES) or initialise a fresh SQLite3 database using the following steps.
To Initialise Fresh Tables in the Database (if a database dump isn’t available):
Activate Virtual Environment
cd into the project code directory.
Generate migration files for all your Django Apps one by one
python manage.py makemigrations <your_django_app-1>python manage.py makemigrations <your_django_app-2>etc.Run the migrate command, which runs the migration scripts generated in previous step.
python manage.py migrateCreate a superuser account. Make a note of the username/Password.
python manage.py createsuperuser
5. Make sure the Django Application is functional
Start the Django Development Server:
$ python manage.py runserverThis should start a functional Django Application on localhost — if you’ve kept the defaults, you can see your Django site by visiting http://127.0.0.1:8000/
We aren’t done yet though. This is just the Development server running locally. We need to make the install ready for production…
6. Install IIS with CGI
| What is IIS? Internet Information Services (IIS) is an extensible web server created by Microsoft for use with the Windows NT family to serve HTML pages or files. That is, IIS would accept request from a remote clients computers and respond with the requested data. IIS is to Windows, what Apache is to Linux/MacOS.Even if you already have IIS installed, you may need to go through these steps to install the CGI feature if it wasn’t installed as part of the original IIS installation. |
1. Installation Steps
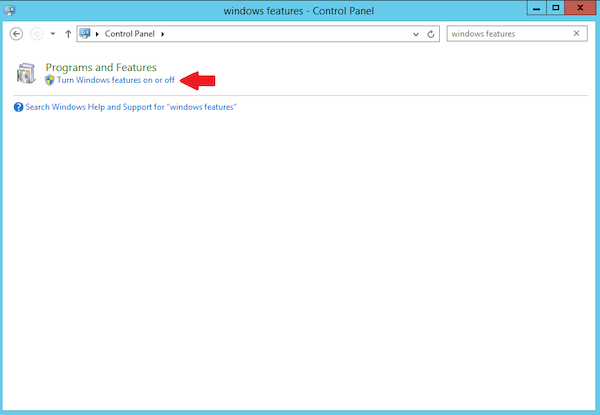
Open the Control Panel
In the search box in the top right, type “windows features” (without the quotes)
In the search results under “Programs and Features” click “Turn Windows features on or off.” This launches the Add Roles and Features Wizard.

On the “Before you begin” step, click “Next”
On the “Select installation type” leave the “Role-based or feature-based installation” radio button selected and click “Next”
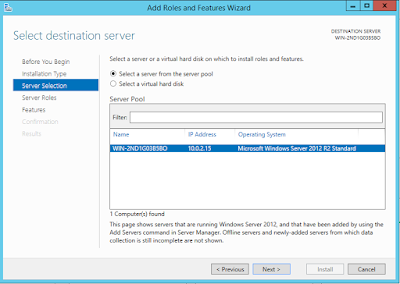
On the “Select destination server” step, leave the current server highlighted and click “Next”

On the “Select server roles” step, scroll to the bottom of the list and check “Web Server (IIS)”
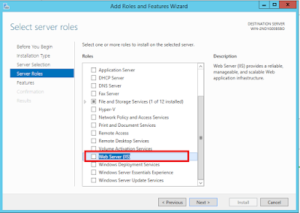
In the “Add features that are required for Web Server (IIS)?” dialog that appears, leave the “Include management tools (if applicable)” checkbox checked and click “Add Features”
On the “Select server roles” step, now that “Web Server (IIS)” is checked, click “Next”
On the “Select features” step, leave the defaults and click “Next”
On the “Web Server Role (IIS)” step, click “Next”
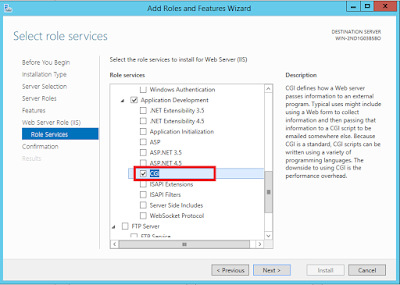
On the “Select role services” step, scroll down to “Application Development,” expand that section, and check the “CGI” box. This will also check the “Application Development” checkbox. With “CGI” checked, click “Next.”

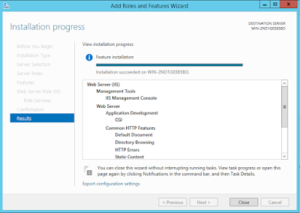
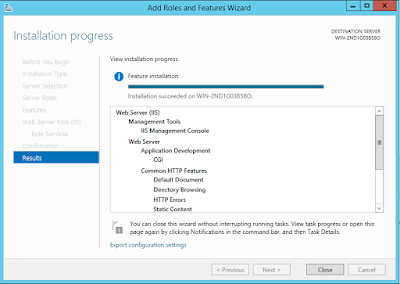
On the “Confirmation” step, click “Install”
Once the installation completes, click “Close”
Close Server Manager
Close Control Panel

2. Verify the IIS Installation
Open a web browser on the server
Enter http://localhost in the address bar and press Enter. You should see the default IIS page.
If you don’t see the default IIS page:
Open Control Panel
Type “services” in the search box
Under “Administrative Tools” click “View local services”
Scroll to the bottom of the list and ensure you see “World Wide Web Publishing Service” listed, and that the status is “Running”

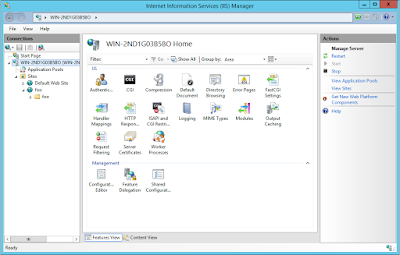
TIP: To open the IIS Manager:
Click the Windows button
Click on Administrative Tools
Double-click Internet Information Services (IIS) Manager(You would need the IIS Manager at several points, so remember these steps.)
7. Configure IIS to serve Django Applications
This is the last major section of this tutorial!
As noted at several places in Django docs, the “Django development server” is not designed for production use, so using a production-quality web server such as IIS is mandatory for production applications.
1. Configure FastCGI in IIS
- Open the IIS Manager
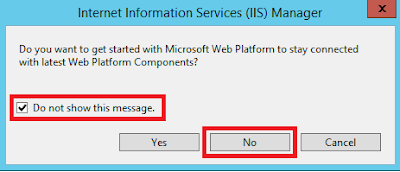
- Click on the name of the server in the list on the left. If you see the following dialog box, check the box “Do not show this message” and click “No.” (You can always get to this later if necessary by clicking “Get New Web Platform Components” under “Actions” on the right-hand side of IIS Manager.)
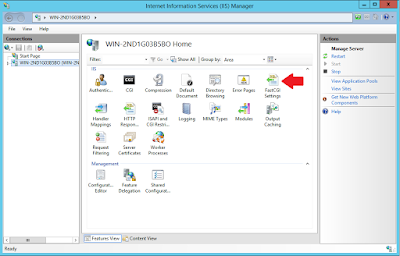
- Double-click the “FastCGI Settings” icon
- Under “Actions” on the right-hand side click “Add application …”
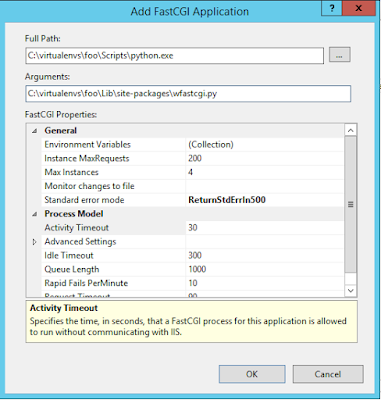
- In the Add FastCGI Application dialog, in the “Full Path” box, type the path to the Python executable for the application’s virtual environment: C:\virtualenvs\foo\Scripts\python.exe
- In the Arguments input box, type the path to the wfastcgi.py file in the application’s virtual environment: C:\virtualenvs\foo\Lib\site-packages\wfastcgi.py
- At this point your settings in the Add FastCGI Application dialog should look like this:
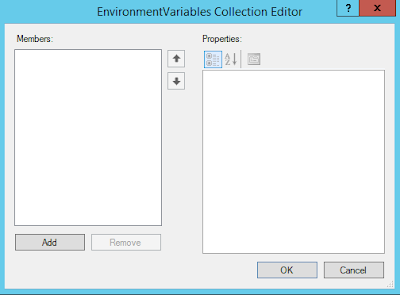
- With the Add FastCGI Application dialog box still open, under the “General” section, click on the “Environment Variables” line, then click the gray “…” button that appears next to (Collection) on the right-hand side of the line. This opens the EnvironmentVariables Collection Editor dialog.
- In the EnvironmentVariables Collection Editor dialog, click “Add”
- In the “Name properties” section on the right, click the input box to the right of “Name,” remove the “Name” text that is already in the input box, and enter
DJANGO_SETTINGS_MODULE(note that this MUST be entered in ALL CAPS) - Click the input box to the right of “Value” and enter donor_mgmt_system.settings
- Click “Add” again and enter the following: Name:
PYTHONPATHValue:C:\apps\donor_mgmt_system - Click “Add” again and enter the following: Name:
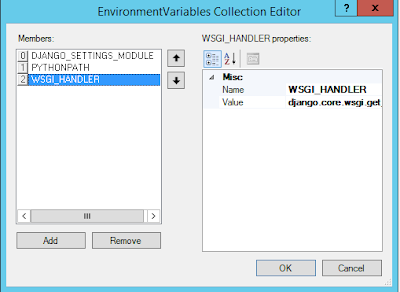
WSGI_HANDLERValue:django.core.wsgi.get_wsgi_application() - At this point you will have three environment variables:
NOTE: All of these settings are CASE-SENSITIVE. They must be entered with exactly the case indicated here in order to work. - Click “OK” to close the EnviromentVariables Collection Editor
- Click “OK” to close the Add FastCGI Application dialog
2. Create and Configure a New IIS Web Site
Next we need to create a new web site in IIS for the Django application, and add a Handler Mapping to the newly created web site so that requests coming to the IIS web site are passed off to the Django application for processing.
- Open IIS Manager
- On the left-hand side under Connections, expand the tree under the server name by clicking on the arrow to the left of the server name
- Right-click on the Sites folder and click “Add Website …”
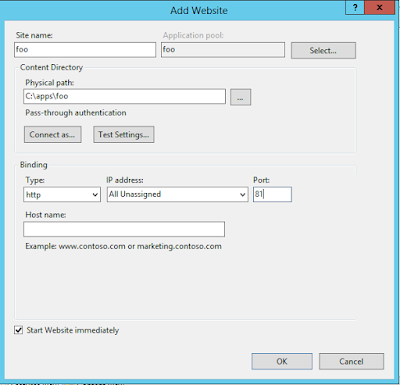
- For the site name enter foo
- For the physical path, type the following: C:\apps\foo
- For the purposes of this example configuration, change the Port to 81, since the Default site is running on port 80. For a real-world application you’ll likely want to use name-based virtual hosting by adding bindings and run the site on port 80.
- You may leave the “Host name” blank. At this point the Add Website dialog should look like this:
- Click “OK”
3. Add a FastCGI handler mapping to this site
Add a FastCGI handler mapping to this site so the requests coming into the site will be processed by the Django application.
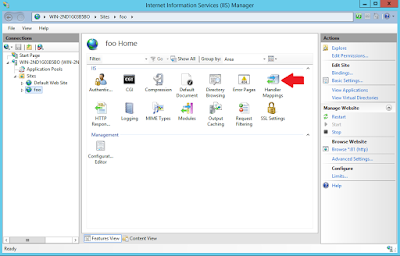
- In IIS Manager, expand the Sites folder on the left-hand side and click on the foo site
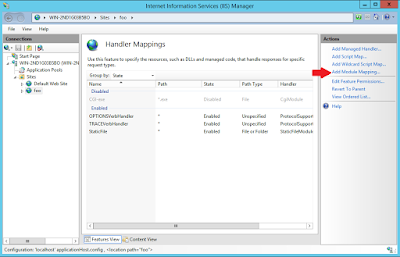
- On the right, double-click “Handler Mappings”
- On the right, under “Actions,” click “Add Module Mapping”
- In the “Request path” box enter an asterisk: *
- Click the arrow on the right-hand side of the “Module” box and select “FastCgi Module” NOTE: Make sure to select FastCgi Module, NOT CgiModule
- In the “Executable” box, enter the following: C:\virtualenvs\foo\Scripts\python.exe|C:\virtualenvs\foo\Lib\site-packages\wfastcgi.py Note that the character after python.exe is a pipe (|), which is entered by pressing Shift-\ on your keyboard
- In the “Name” box, enter Django Handler (you can call this whatever you want; it’s merely a friendly name for the module mapping)
- The Add Module Mapping dialog should now look like this:
- Click the “Request Restrictions” button and uncheck the “Invoke handler only if request is mapped to:” checkbox.
- Click “OK” to close the Request Restrictions dialog.
- Click “OK” to close the Add Module Mapping dialog.
- When prompted “Do you want to create a FastCGI application for this executable?” click “No” since we created the application earlier. Note that you CAN have it create the FastCGI application for you from the module mapping, but the settings seem to be different and the end result isn’t fully editable. I also detailed how to create the FastCGI application to be as thorough as possible with all the various pieces involved.
- You will now see the Django Handler listed in the Handler Mappings for the foo website:
4. Configure Django and IIS to Serve Static Files
Now we have things more or less working but we aren’t quite done.
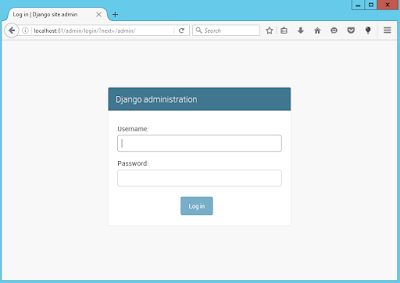
If you visit http://localhost:81/admin via a browser, you’ll see something like this:
The reason things look a little strange is because IIS doesn’t know where things like the CSS and image files for the Django application are located. We need to perform a couple of steps for IIS to be able to serve these files.
This isn’t an issue during development since Django has a static file server built into it, which can even serve static files if they are spread over various locations in code. But in production we need a comprehensive Webserver like Apache/IIS/Gunicorn to handle serving these files.
How Django handles static files is a bit of a topic in and of itself, so for further information please consult the Django documentation (https://docs.djangoproject.com/en/2.0/howto/static-files/). In this guide we’ll focus on a specific set of steps to get things working without getting into too many behind-the-scene technical details, the different philosophies on where static files can or should be placed, or the various and sundry ways in which this aspect of Django applications can be addressed.
For complete information about Django’s handling of static files, and production deployment of static files, please refer to the following section of the Django documentation:
A) CONFIGURE DJANGO’S SETTINGS.PY FILE TO TELL IT WHERE TO PUT THE STATIC FILES
First, your Django application’s settings file needs to include a STATIC_ROOT setting, and this setting is not in Django applications by default.
This STATIC_ROOT setting is used when Django’s collectstatic management command is run to determine where to place the collected static files.
In our sample foo application, we’ll tell Django to collect the static files in a static directory located in the same directory as the settings.py file. (You can ultimately put your static directory wherever you wish, but this is where we’ll be putting it for the purposes of this example.)
To accomplish this, do the following:
Using a plain text editor such as Notepad, or Idle if that was installed when you installed Python, open the file
C:\apps\foo\foo\settings.pyScroll to the bottom of the file, or use the find feature of your text editor, and find the
STATIC_URLsettingAbove the
STATIC_URLsetting, add the following setting:STATIC_ROOT = os.path.abspath(os.path.join(BASE_DIR, 'foo', 'static'))The placement of the
STATIC_ROOTsetting in the settings.py file doesn’t matter, but putting it right next to the STATIC_URL setting is typical and keeps all the settings related to static files in one place.The
STATIC_ROOTsetting we’re using as our example will put the static files inC:\apps\foo\foo\staticSave the
settings.pyfile
b) Run the collectstatic command
Now that Django knows where to put the static files, we can run the collectstatic management command. This command takes all the static files for your project, including the static files used by the Django admin and other packages in your virtual environment, and puts them under one static directory, the location of which is the STATIC_ROOT setting we added above, so they can be served by the web server.
C:\virtualenvs\foo\Scripts\activate.bat
cd django_apps_directory
python manage.py collectstatic
Type yes at the prompt where Django asks you to confirm copying the the files into the STATIC_ROOT directory.
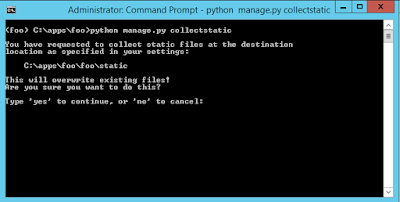
The static files will then be copied to the directory indicated by the STATIC_ROOT setting.
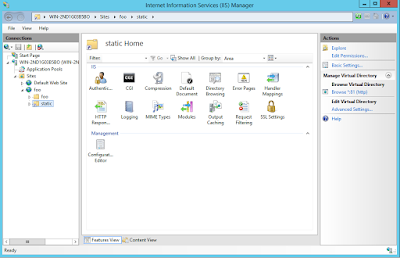
c) Add A static virtual directory to THE IIS web site
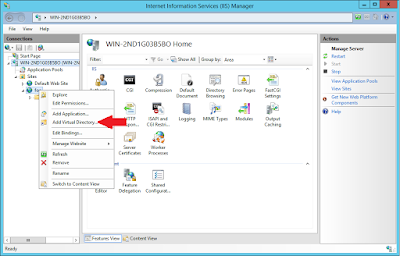
Now we have all our static files in one place, but we still haven’t told IIS where they’re located. We’ll accomplish this by adding a static virtual directory to the IIS web site for our application.Note that the name of the virtual directory in IIS must match the value of the STATIC_URL setting in the Django application’s settings.py file, absent the beginning and trailing slashes. For our sample application we’re using a value of /static/ for the STATIC_URL setting, so the name of the virtual directory in IIS will be static.Create a virtual directory in IIS as follows:Open IIS ManagerOn the left-hand side under “Connections,” expand the server’s tree Expand the “Sites” folder Expand the foo web site. At this point, things should look like this: Right-click the foo web site and click “Add Virtual Directory” In the Add Virtual Directory dialog, enter the following values: Alias: static Physical path: C:\apps\foo\foo\static
Click “OK.” You’ll see the static virtual directory appear under the web site.
d) Configure Handler Mappings in IIS for the static Virtual Directory
The last step is to tell IIS which handler to use to serve files out of the static virtual directory. Since at this point our Django Handler is set to serve all files for our application, even with the static virtual directory in place the Django Handler will still be attempting to serve these files.
IIS already has a static file handler active in the web site, but it’s down further in the list of handlers than the global Django Handler we configured, so to get IIS to serve the static files under the static virtual directory we’ll move the static file handler to the top of the handler list on the static virtual directory.
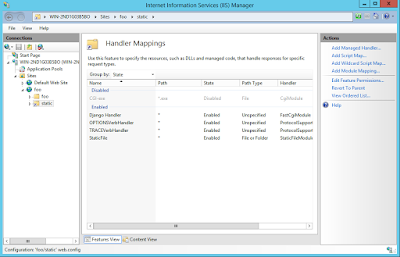
- Open IIS ManagerExpand the server treeExpand the foo web siteClick on the
staticvirtual directoryDouble-click the “Handler Mappings” icon. You’ll see the following list of handler mappings:
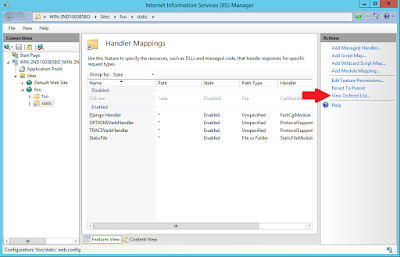
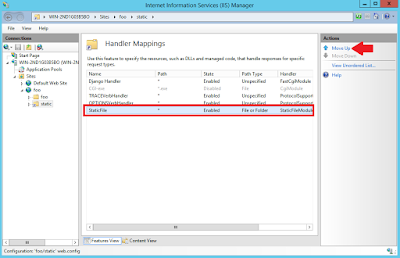
On the right-hand side under “Actions” click on “View Ordered List …”
You’ll now see a list of the handler mappings in the order in which they’re run, with the Django Handler at the top.
Click on the StaticFile handler at the bottom of the list, then click “Move Up” under “Actions” on the right-hand side.
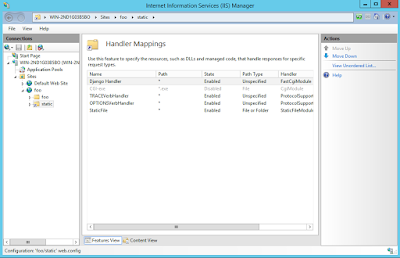
Note at this point you may receive a warning that by moving handlers you are detaching this virtual directory from the inheritance of the parent’s handler mappings. This is what we want to do, so if you get this warning click “Yes”.Continue to click “Move Up” until the StaticFile handler is at the top of the list of Handler Mappings.
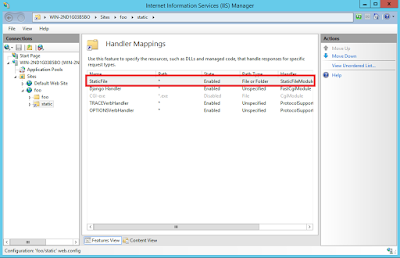
With the StaticFile handler at the top of the list of Handler Mappings, requests that come into the static directory will be handled by the StaticFile handler as opposed to being processed by the Django Handler, so IIS will serve the static files now.Confirm that everything is working by going to http://localhost:81/admin in a browser. You should now see the CSS being applied to the page.
At this point your Django application should be playing nicely with IIS. You can now login with the password you configured during the initial Django setup i.e. when using manage.py createsuperuser or manage.py migrate etc. at the start.If you’re only able to access Django on the local system you might need to open the required ports on the Firewall.
8. Firewall Settings
You’re most probably going to access the server from a remote browser. To do this, you’ll need to open the Firewall ports.
I setup this server on a LAN with 192.168.0.x range of addresses (255.255.255.0 subnet mask). Incoming connections to port 81 were locked on the Server.
Say the Server’s IP Address is 192.168.0.100:
- Test that the remote server is reachable
ping 192.168.0.100 - Open
http://192.168.0.100in a browser (from the client computer). This was accessible i.e. Port 80 was open. - Open
http://192.168.0.100:81If this link is accessible, you’re done setting up. Else, you need to open the server ports. - Open Control Panel. Click on System and Security. Then click on Windows Firewall.
- Select Advanced settings and highlight Inbound Rules in the left pane.
- Right click Inbound Rules and select New Rule.
- Add the port you need to open and click Next.
- Add the protocol (TCP or UDP) and the port number into the next window and click Next.
- Select Allow the connection in the next window and hit Next
- Select the network type as you see fit and click Next.
- Name the rule something meaningful and click Finish.
- Visit http://192.168.0.100:81 again in a browser from the remote server, and everything should be active.
If you’re still not able to access the django application from the remote computer, work with your System Administrator to figure out the problem. DONOT disable the entire Firewall.
Additional Notes
Follow the steps closely when configuring IIS
Configuring IIS might give you the most issues. In particular configuring the static files location in IIS. I had to redo the steps twice before it worked. So yeah, patience and caution as always.
Performance on Windows
I used this Django install with MySQL installed on the same server. Both Python and MySQL were painfully slow on this windows server in comparision to the same setup running on Linux on even half the hardware. I didn’t have time to benchmark it but a quick search on the net will give you enough tips on improving MySQL performance on Windows.
Security and Firewall
If you’re operating on a critically important server, check with the server administrator regarding the firewall rules you’re easing to make the django application accessible. Do not disable virus scanners/firewalls without explicit permission from the system administrator.
Database
The application I created, though critical had very little load (1 to 2 users at any time). In this case Sqlite3 might be as good as MySQL/Postgres. It’s when there are too many users and concurrency concerns that Sqlite3 has a shortcoming, otherwise it’s a very good database.
Leave a Reply